 Skip to content
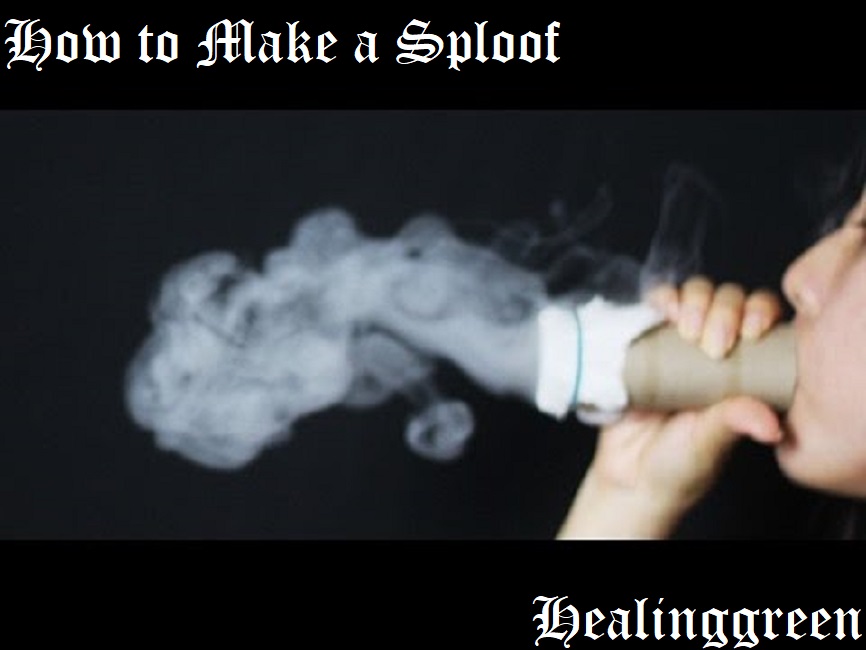
Are you having trouble with anti-cannabis neighbours? Or perhaps your landlord isn’t a fan of the herb. Of course, one option is to simply abide by the rules and find a suitable outdoor spot to enjoy getting stoned—a much safer option if posible eviction is in the cards. On the other hand, cannabis really is a medicine, and if braving the cold temperatures of winter doesn’t appeal to you in order to get medicated, then we have an option for you: a sploof.
A sploof is a DIY piece of kit that acts to filter the scent of cannabis from flooding a room when smoking. Sploofs are extremely easy to make and are mostly forged out of items that can be found lying around the house.
In essence, a sploof is a tube with a filter on one end. Upon taking a hit from a bong or joint, the smoker exhales into the open end of the tube, filtering the smoke and preventing it from causing suspicious smells from arising within the residence. Below is a guide on how to construct your own cannabis concealing device.
WHAT YOU’LL NEED
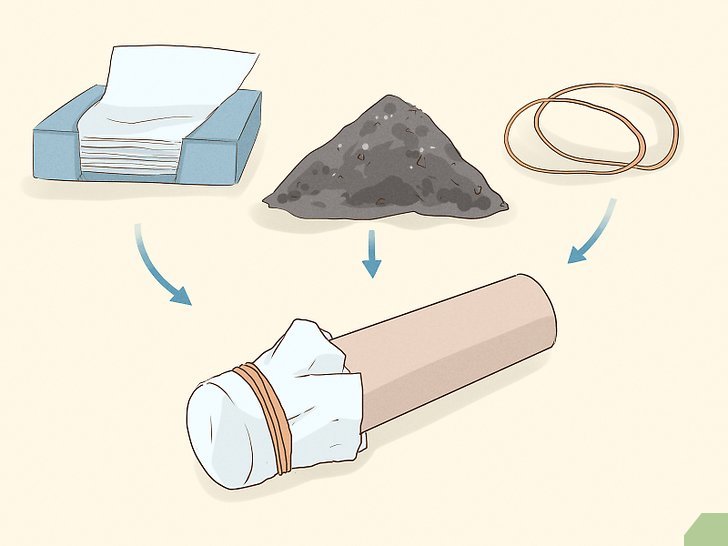
Making a sploof won’t exactly drain your wallet; in fact, most of the equipment needed is most likely already within your house. Just check the kitchen cupboards and have a fish through the recycling bin. To make a sploof, you will need:
- Cardboard toilet paper roll or plastic bottle of any size
- Pair of sharp scissors or knife/blade
- Rubber band, piece of string, or some type of tape
- Scented dryer sheets to banish unwanted aromas
STEP 1
- Step 1 will vary depending upon the piece of equipment you’ve elected to use. If you are using a plastic bottle, begin by cutting the top ⅓ off and discard the bottom ⅔. If you are using a cardboard toilet roll, no modification is required at this stage.
· STEP 2
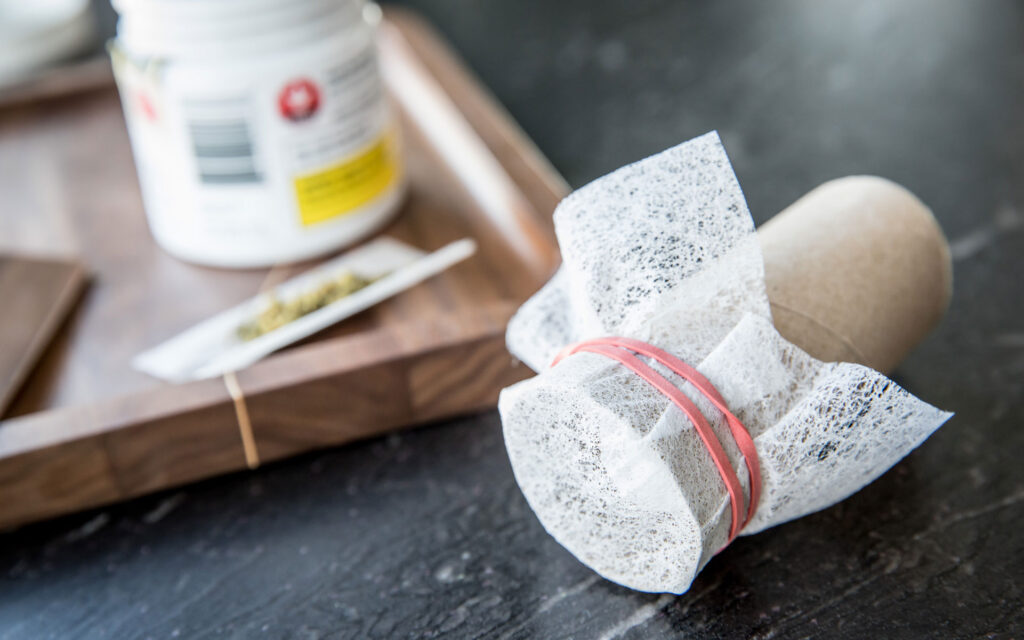
- Take your scented dryer sheets and begin packing them into your vessel of choice. The packing doesn’t have to be dense; around 3–4 sheets should do an adequate job of disguising the smell of ensuing cannabis fumes.
· STEP 3
- Now that your sploof is loaded with scented dryer sheets, it’s time to add the last, most important one. Wrap a dryer sheet over one end of your sploof. If you’re using a toilet paper tube, it doesn’t really matter which end you choose to do this to. If you are using a bottle, place the sheet over the wider end where you made the initial incision. This will allow you to use the smaller end as a mouthpiece to exhale smoke into, making it more aesthetic as well as functional.
- To attach this dryer sheet to the main body of the sploof, use a piece of string or an elastic band. If using a large plastic bottle, you might instead find it easier and more practical to tape this sheet on.
STEP 4
Your sploof is now fully operational, and you can begin to exhale cannabis fumes into it and watch it prevent the skunk from spreading. The next steps are for the perfectionists out there who want to continue to work on their creation and make it visually pleasing.
First, begin by cutting around the edges of the dryer sheet mentioned in step 3 to remove the unnecessary excess. This makes the sploof look much moretidy and also eliminates the risk of accidentally pulling the dryer sheet out or loosening it.
If you want a sploof that is more efficient at getting rid of the weed smell, then you may need to learn how to make an activated charcoal sploof.
Activated carbon is porous, and even a tiny piece (which can fit in the palm of your hand) can have a surface area of thousands of square inches! Follow the steps below to learn how to make a sploof using activated charcoal.
Step #1: Assemble Your Supplies
Since this sploof will perform better than the cardboard and dryer sheet model, it might be worthwhile for you to make a trip to the hardware store and buy ABS or PVC pipe. Anything around 10-inches long will do, so don’t go all out and buy more pipe than you need for this project.
If possible, ask the store attendant to look around for anything that you can use as a lid at one end of the PVC or ABS pipe. It would be great if you can get threaded caps that you can screw onto the ends of the pipe.
Buy some activated charcoal, unscented dryer paper, rubber bands or string, as well as the other items listed for making the first sploof. Once your supplies are all in one place, then you will need half an hour tops to put this sploof together.
Step #2: Drill Holes into One Cap
Get one of the plastic caps that you obtained from the hardware store and drill several tiny holes through it. Once again, those holes should neither be too large nor too small.
The purpose of those holes is to let the sanitized weed smoke come out of the sploof. If you notice that the airflow isn’t sufficient, consider enlarging the holes ever so slightly. Place this prepared cap onto the bottom of the sploof.
Step #3: Insert a Dryer Sheet
For this step of the how-to-make-a-sploof-process, you’ll need an unscented dryer sheet. Fold it, then insert it at the end of the pipe. That will be the bottom of your sploof.
This should be done before you attach the cap with holes in it. The dryer sheet is optional, but it is a good idea to include it because it prevents the smaller activated charcoal particles from making a mess.
If you noticed that your activated carbon is dusty, don’t put the dryer sheet in the PVC tube/pipe just yet! Instead, screw the cap onto the pipe and pour the activated charcoal into the pipe.
Run some water through the charcoal in the pipe, so all the dust can be washed out through the holes you drilled into the cap.
Let the carbon completely dry, then you can proceed with the step of placing the dryer sheet at the bottom of the PVC pipe. Alternatively, you can use paper towels to dry your activated charcoal to save time if you need to complete this project quickly.
Step #4: Position the Bottom Cap
With the dryer sheet in place, you can now twist the cap onto the bottom of the pipe.
Make sure that it is firm and will not drop off accidentally. If it isn’t firm, use any adhesive tape, such as duct tape, which you then secure the cap at the bottom of the pipe you are using to make the sploof.
Step #5: Put the Activated Carbon Inside
Support the bottom of the pipe with the cap secured and pour the activated carbon into the pipe. Don’t fill it to the brim. If you do, you may accidentally spill this useful material during use. Instead, fill it to about a three-quarter level and no more.
Step #6: Cover the Activated Carbon
You will need to use a sheet or two of unscented dryer sheets for this step as well. Fold and cut the dryer sheets into pieces that can fit neatly into the pipe that you have just poured the activated carbon into.
Two or three layers should be sufficient since you’re only using it to prevent your mouth from coming into contact with the activated carbon as you exhale into the sploof. There is no harm in the carbon touching your lips, but we want your attention to be focused on enjoying your joint, don’t we?
Step #7: Test Your Sploof
Now is the time to light up a joint and reward yourself for the work that you have just done. Draw deeply on that joint and exhale into the open end of the sploof. As soon as all the smoke is in, cover the top of the sploof and let the activated carbon do its magic. You’ll be able to see whether the sanitized smoke is flowing out of the sploof at a decent rate.
If the smoke is coming out at a very slow rate, then it might be time to remove the cap at the bottom and widen the holes a little. This will help with the pressure difference between the interior and the exterior of the sploof as it pulls the weed smoke through the activated carbon and out via the holes in the cap.
Step #8: Pimp Your Sploof
Now it is time for the final step of learning in this how to make a sploof tutorial! If you are satisfied with how the seven steps listed above have turned out, then you can add your finishing touches.
Remember that you used PVC or ABS pipe for this homemade sploof, so this device will be your companion for a long time to come. You might, therefore, want to personalize it! Decorate the exterior in any way you choose. For example, you could add some stickers or pick up a permanent marker and bring out your artistic side.
Whichever way you use to create your sploof, it’s a super convenient tool to have on hand. When combined with freshly grown marijuana, you can enjoy an odor-less smoke without going out to buy weed. To get started growing your personal weed plant, purchase the Pot for Pot Complete Kit. In no time, you’ll be discreetly enjoying marijuana in the comfort of your own home.
This iis the perfect blog for anybody who hopes to
find out about this topic. You definitesly puut a brand new spiin on a topic which has been discussed for decades.Wonderful stuff, just excellent!
Wow cuz this iis great work! Congrats andd
keeep it up!
holy fuck thanks! i havent been able to smoke in my house bc my parents bulted my windows shut. i can only use the bathroom window but i have to take of the big ass screen and it sucks everytime. thanks man!